Skyware Systems Pick-up from a Group feature allows you to search for and pick up a room from an existing Group reservation. The feature uses the Group Reservation wizard to identify the guest picking up the room against the block, select a room from the block (or outside of the block if allowed) and applying the other information for the block to the guest stay record.
The system will take you through the reservation wizard with the aspects of the group block (arrival/departure dates, room types, etc) pre-selected. You can modify the dates, room type, etc for the individual reservation being created against the block. This may be necessary since the individual guest stay might not follow the group defaults exactly. This is especially true with wholesale blocks where the individual pick up will typically be much shorter than the length of the wholesaler block.
By using the Pick-up from a Group command you will move through the Wizard and create a Guest Reservation using the information from within the Group reservation.
Depending on your Property's configuration, you may have the Pick-up From a Group command available from the Quick Menu.
Alternatively, select the Pick-up From a Group command from the Reservations Menu.
The Reservations Menu may be reached either directly from the Quick Menu, or by using the Full Menu and selecting Reservations => from the Other section.
Click the Pick-Up from a Group command in the Group Reservation section of the Menu.
IF your Property is using Skyware Systems Sales and Catering system, you can also use the Sales and Catering menu, by clicking on the Pick-up From a Group command in the Groups section of the Menu.
When the Pick-up From a Group command is selected, the Select Group to Pick Up From screen appears.
This screen allows you to choose a Group Block to pick up a reservation from.
You may enter your search criteria such as Confirmation name, Booking Name, or Arrival or Departure dates
By default, the search looks for group reservations only, however you can use the checkboxes across the top of the search fields to search by In House, Reservations, Groups (In-House) or Groups (Resv).
After entering the search criteria, select <<Press to Search>> to search for matching records.
Note: If you have relatively few Group Blocks simply select <<Press to Search>> immediately to list ALL your Group records.
Click on the Group you wish to pick up from, from the search results list.
This opens the Group Reservation Wizard, allowing you to make any necessary changes and pick up a room from the Group
Block.
Alternately, Pick-up a single reservation from a Group Block by clicking the Pick Up Reservation button in the local tool bar of the relevant Group Stay Information screen (Main Folio).
As this button is displayed on the specific Group Main Folio, this opens the Group Reservation Wizard directly (no need to complete a search).
However you reach it, once you have opened the Group Reservation Wizard your Skyware system will walk you through the Reservation Wizard screen by screen, with the aspects of your Group Block (arrival/departure dates, room types, etc) already selected. Once you have selected the room type, add the remaining information (select the guest, add a payment method, add a deposit request, post a deposit, etc) and click Finish.
Be sure to check and if need be modify the Dates, or other options for the individual reservation being created against the Block.
This is necessary since the individual stay might not follow the group defaults exactly. For example, your guest currently attempting to pick up the room may be staying only 3 nights rather than the 4 you have in the block.
This is especially true with wholesale blocks where the individual pick up will typically be much shorter than the length of the wholesaler block.
When you move on to the Room Types screen in the Wizard, what you will see depends on the Pick up Type selected when the Group block was created.
NORMAL is the most restrictive on your Group Block reservation, this will not allow you to pick up any Room types outside the block. Then
If the Group Block does not allow for Pick Up Outside the Group Block, the room type screen only displays the room types/dates that have been reserved for the main group block. You CAN however use the "Passcode to allow Pick Up Outside Block" button to allow selection of a room not included in the block, if you are authorized.
PICKUP OUTSIDE BLOCK WITHIN TOTAL BLOCK. You can pick up Room types outside the block, but ONLY to the TOTAL number of rooms specified within the block.
ALLOW OPEN PICKUP OUTSIDE BLOCK is least restrictive.
If the group allows for Pick Up Outside the block, the system will show all room types with the group room types in orange. Since you could select any room available in the hotel, ALL room types appear with their overall availability.
You should select the guest's desired Room Type.
Once you have selected the Room Type, it will be displayed in yellow.
You can now continue moving through the Wizard and add the remaining information.
Using the orange buttons, move on to Packages, Assign Room #s, Check Rates, or move directly to Guest account.
Click on Packages to open the screen to add any Package the guest desires (if not already part of the Group Block), or skip this screen.
Click on Assign Room #s to open the screen to assign a particular room number to the guest; this does not however have to be done until check-in, so you may also skip this screen.
Click on Check Rates to open the screen to alter the rate for this Pick-up, although this should have been set during the creation of the Group Block (where Room Rates for THESE Room Types on THESE dates for THIS Group ONLY were set) and so may not be necessary now, meaning you can also skip this screen.
The next NECESSARY screen in the Wizard for a Pick-up is the Guest Account screen.
If a Guest has stayed with your Property previously, use the Previous Guest search section to find them.
Search by Last or first name, Company, Phone Number, Guest ID, City or State.
If you are not sure, you may always search by name; enter the (at minimum) first three letters of the guest’s last name and if you have it the first initial as well. Click << Press to Search >> and check the list of previous Guests. Skyware Systems will display your first 200 matches.
Selecting a Guest Account will AUTOMATICALLY populate the Pick-up reservation with the required fields and any additional information on record, and open the Payment screen.
If you do NOT have the Guest Account Information, you will need to complete at minimum the required (red) fields in the New Guest section (in the lower part) of this screen.
Skyware Systems will always require the LAST NAME, FIRST NAME and GUEST TYPE to be completed. SEGMENT TYPE (and/or Origin) may also be required.
Required fields vary between Properties, and you should check what your Property requires.
Any additional information you have (such as address, phone number or email) for the Guest Reservation should be added here; you may also click on the orange button "Advanced Profile" to enter further information there.
Once you have entered the information, move on to the Payment screen.
Note: If you enter information into the New Guest section of this page, you will need to click the orange button Payment >> or the Payment tab button to move on. There is no Save button, it will occur automatically when you go to the next screen.
On the Payment screen, you will need to complete any details if you require a deposit, etc. just as you would with a regular Reservation.
If NOT, you can move on immediately by clicking the orange Finish >> button or the Finish tab, which will take you to the Main Folio page for the Group booking.
NOTE: This is NOT a page for posting, only adding payment information to hold the reservation, if necessary. If you have received a payment that needs to be posted, that happens on the Posting Screen & Statement screen.
This screen allows you to enter how the Guest will be paying for their charges and enter a deposit request if required that will trace (remind you) that a deposit is due for this guest.
Note: If you have not entered all required fields in the Guest Account screen, you will not be allowed to move on to the Payment screen. Instead you will receive a Validation Error (for example, Validation Error - Required Field: Last Name) indicating the problem, and see the Guest Profile screen again.
Payment Method: This is a drop-down menu of the payment methods that have been configured for your system. If you do not see the option you need available, you will need to configure it. See Property and System Configuration Overview for more details. Select one.
If selecting a credit card, and you do not have a number in the token field, click the "Click Here to Enter Credit Card Information" button to open a new screen to your gateway provider (Shift 4, Tenerum or USAePay) and manually enter the credit card information to receive the token. Alternatively click the "Check-In Using PinPad" button to activate your PinPad/EMV device and open a new screen to your gateway provider (Shift 4, Tenerum or USAePay) and receive the token. See Using Pin Pads/EMV Devices for further details.
Note: If your Guest Account has a Credit Card associated with it already that is NOT the desired payment option in this case, you should click the "Clear Credit Card Information" button before inputting a new card to prevent the card on file being charged.
Authorize for Room and Tax only: This box may be checked or unchecked. By default it is unchecked. If checked, the payment method here will only be charged for room and tax, and a different option is needed for any incidentals (for example room service or parking). This is often determined by the guest type - a company may be paying the room tariff and tax, but the guest themselves is responsible for any further charges.
A/R Account #: Accounts/Receivable. This is a direct billing account. This may also sometimes be called a City ledger (C/L). Use this if the stay is being billed directly to a Company. If using one, enter the number in the field or the search icon may be used to open up a pop-up window containing all the available Accounts and allow you to select the appropriate one.
Guarantee Reservation: This box may be checked or unchecked. By default it is unchecked. If it is checked, this means that the reservation payments must be made even if the guest fails to arrive. Exact terms of a guaranteed reservation vary between properties.
Send Confirmation?: This box may be checked or unchecked. By default it is unchecked. If it is checked, this means you will be sending (usually via email) a confirmation of the reservation to the guest.
Express Check-out?: This box may be checked or unchecked. By default it is unchecked. If it is checked, this means the guest is allowed you to checkout of your Property without having to return to the Front Desk. The credit card used at check-in is billed for charges or purchases during your stay.
Suppress Rate?: This box may be checked or unchecked. By default it is unchecked. If it is checked, this means Skyware Systems will hide the rate amount on screens throughout the application (making rates confidential).
Deposit Required: If a deposit is required for this reservation (for example, an amount equivalent to one night stay), enter it into this field. The default value is 0.00.
Deposit Due By: If you have entered a value in the deposit required field, specify the date this deposit is required by, by selecting from the drop-down menu options for the date or the calender display.
Travel Agent #: Used for commissions, for example Expedia, Booking.com. If used, Travel Agents will receive a commission on the transaction. This can be a percentage or a dollar amount. The default option is not attached to anything, with an ID # of 0 (none). If using one, enter the number in the field or the search icon may be used to open up a pop-up window containing all the available Accounts and allow you to select the appropriate one.
Comments: This box may contain anything you want. This box is set up NOT to print on anything.
Once you have finished working your way through this Wizard, and have completed all the required fields/any optional fields desired, you should click the orange "Finish" button or the gray Finish button in the top set. This will take you to the Stay screen, otherwise called the MAIN FOLIO for your guest. Click Finish and your walk in will be complete.
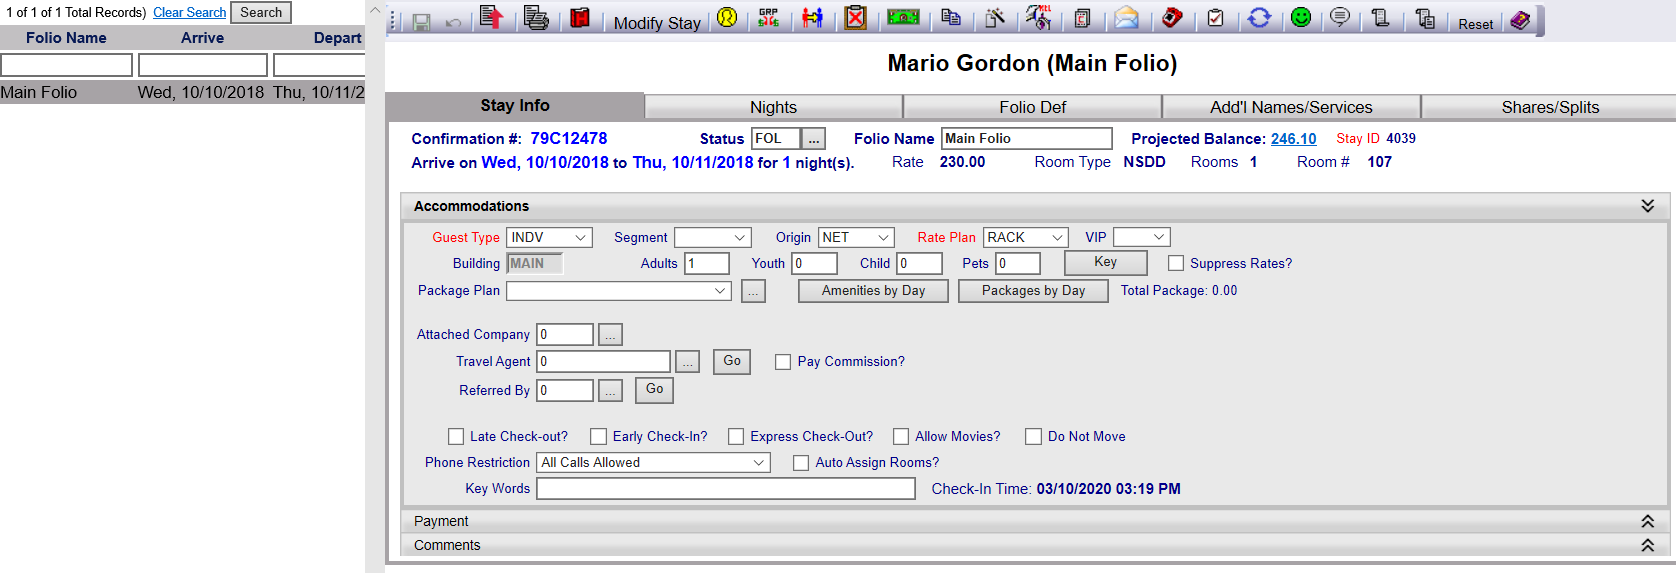
When you access a Folio (or stay), the default tab that appears is the Stay Info tab. Whenever you work with guest information in the system, you are working with a "stay." This tab allows you to manage basic guest information, and perform various tasks . See Stay Information tab for more details.
If the Finish button appears and you have entered all of the information currently available, click Finish to create the reservation and apply a RESV status to the folio.
The Posting Screen and Statement screen allows you to view all of the charges that have been posted to the guest's account and post new charges.
The screen shows both the Group Master this Pick up is being made in, AND the individual guest making the deposit.
There are four main sections to the Posting screen.
Section One: The first section allows you to select the Folio to post to. (There may only be one option here).
Select the Folio (the system will default to the Main Folio).
Select the document the payment will post to: The default option is Default statement, set in the Property Definitions section. There is a drop-down menu of other documents to choose from. If the document you desire is not available, you may configure one for your Property. See How To Create or Customize Your Documents for further details. You may choose to print or email (if an email address has been attached to the guest) the statement to the guest, or click the button to check the guest out if it is the end of their stay. Once the balance is zero, check out that folio by clicking Check Out.
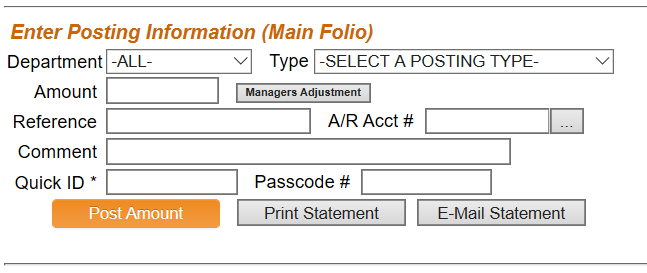
Section Two: The second section deals with the Posting information itself; the department the charge was generated from, the type of posting, and the actual amount. Post charges to the folio by entering posting information and clicking Post Amount.
Department: This is a drop-down menu of options. These can include options such as Gift shop, Spa, or Tax. Select one or leave as the default -ALL-. Posting departments are a means of reducing the extremely large potential list of posting types into more manageable groupings.
Note: The following Post Departments come standard with your Skyware Systems system at install: Room, Tax, Payment, and Deposit. You can alter these or add others for your property in the Property and System Configuration area. See Property and System Configuration Overview for more details.
Type: Posting Types or Posting Codes are codes that are used to post charges to guests or group folio accounts. These can include options such as massage, room charge, or parking.
Note: The Skyware Systems system comes standard with a room charge (post type 100 which can not be deleted), taxes, and deposit and payment post types (payment and deposit types must be separate for reporting purposes). Unlimited additional post types can be added. You can alter these or add others for your property in the Property and System Configuration area. See Property and System Configuration Overview for more details.
Amount: This is the amount of the charge or credit posted to the Folio.
Manager's adjustment: If this button is clicked, you will get the option to select either normal, credit or charge for the amount shown. If you post a Manager's adjustment it will either add a charge (positive amount on the guest's folio) or a credit (negative amount on the guests folio) to the statement, altering the Folio balance due. Using normal will post as a charge or a credit depending on the default set up for the posting type. The Manager's Adjustment allows you (provided you have rights to do so) adjust and take off a specific amount to a particular post type, without selecting a specific charge. For example if the guest had several banquet charges and you wanted to adjust off a flat amount of "Banquet Food" without selecting an original posting to adjust off, use the Manager's Adjustment feature.
The Manager's adjustment feature can also be used to post to a closed folio, for example a historical or canceled folio. You will be required to enter your pass code that has been set up at your property.
A/R Acct #: Accounts/Receivable. This is a direct billing account. This may also sometimes be called a City ledger (C/L). Use this if the stay is being billed directly to a Company. If posting to one, enter the number in the field or the search icon may be used to open up a pop-up window containing all the available Accounts and allow you to select the appropriate one.
Reference: This will be based on your Property's standard operating procedures (SOPs). A reference could be for example a Check Number. The reference will be printed on the guest receipt, and cannot be changed once posted.
Comment: This will be based on your Property's standard operating procedures (SOPs).This may be anything you wish or left blank. The comment will be printed on the guest receipt, and cannot be changed once posted.
Quick ID *: For Properties using the Quick ID, this is required for any posting types displaying an asterisk (*). These will typically be payments or deposits.
Click the Post Amount button, which will post the amount to the statement.
The screen will give you the "Successful Post!" message, and the posted amount will now be visible in the Statement section of the screen.
Click the Print Statement button to review and print a copy of the guests statement. The statement will just show the postings, adjustments and transfers, but will not show corrections (corrected postings).
Click the Email Statement button to email a copy of the guests statement to the guest email on file.
Section Three: The third section is the Postings Statement, and it lists in a table form all the postings associated with the Folio selected. There are several possible categories which may contain information, but not all are essential.
Posting Date: The date the posting was listed or altered. The postings are listed by Date posted.
Description: This is the option selected from Posting Type.
Reference: This is information entered in the reference field of the Enter Posting Information section.
Amount: The amount posted.
Type: This is in reference to why the posting was made. "New" means this was the first time a Posting was made in reference to this charge. A "Correction" is done on the same day as the original posting. Any changes made to a postings on a date different than the original posting will be considered "Adjustments".
There are several other columns that may contain data if it was included in the posting (for example if a comment was added, or an A/R account used).
The last column is a little different. This is called Suppress, and every line in the Statement table will contain a check box in this column. The check box may be checked or unchecked. By default it is unchecked. If it is checked, it will suppress the line item from printing; this means this posting item will NOT appear on the printed or email copies of the statement. This may alter the balance on the printed statement.
Section Four: The fourth section allows you to, if you wish, transfer the postings in the statement from one folio to another. Check the Another Guest button to allow transfer.
To transfer postings from one guest or folio to another, select the postings that you wish to transfer and click the Transfer Selected Postings to button. Search for and select the guests stay/folio that you wish to transfer the postings to.
Note: Above the Statements table (in section three) there is a button called "Select All for Transfer". If clicked ALL postings listed in the displayed statement will be selected.
The system will list the type as "Xfr" for "transfer" and show who the transfer went to / came from in the comments area.
Reason for Transfer: You should type in why the postings are being transferred here.
NOTE: If the guest has more than one folio and you wish to transfer charges from one folio to another, the folio numbers will appear in the transfer section. Select the appropriate postings, click the folio to transfer the postings to and click Transfer Selected Postings to.
Transfer postings to another folio using the Transfer Selected Postings button.
To transfer all or partial balances click the Transfer Balance button and (if needed change the amount and) click OK.
This will take you to the Select Folio to transfer to page where you can search by guest name or room number. Clicking on the guest will initiate the transfer.
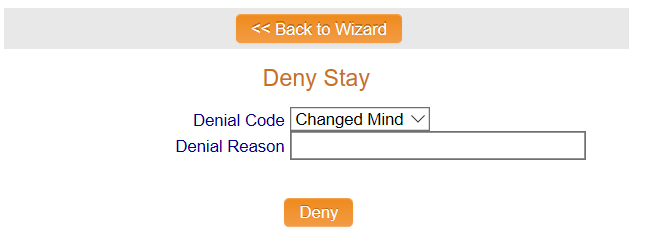
At any point If you do not wish to take the reservation, or if they decide not to book at your property you can enter it in as Denied Business PRIOR to clicking Finish by clicking on the pink "Deny" button in the upper right.
If a Guest decides that they do NOT want a reservation, clicking the pink "Deny" button in the top bar will release the room(s) back into inventory. A new Deny Stay screen will be displayed, where you will pick a code from those available in the drop-down menu and can type in anything you would like into the Denial Reason box. Denial codes are used to track business that does not materialize, whether you do not take the reservation or the guest does not want to stay at your property. Some examples of denial reasons might be: Rate too high, did not like the location, guest has bad credit.
This selection is part of the Property and System Configuration area of Skyware. You can alter these or add others for your property in the Property and System Configuration area. See Property and System Configuration Overview for more details.
Once you have clicked the orange button Finish >> in the Wizard, the Pick-up reservation is considered complete and the INDIVIDUAL Main Folio screen for this Guest reservation will be opened.
However it will not be quite the same as a regular Individual Main Folio;
It will be called GUEST NAME (Main Folio) (BOOKING NAME)
(The booking name being the one that the Group Block reservation is known in the system as) to show that it is associated with a Group Block.
In the local tool bar there will be two different buttons, Go to Group Master and Remove from the Group Master.
Clicking on Go to Group Master will open the Group Main Folio page that this guest's reservation has been associated with.
If you open the Group Booking, the Nights/Pickup tab of the Group Main Folio shows the room block information as well as the guests that have been picked up against the block, which will now include the Pick up you have just made.
Clicking on Remove from the Group Master will bring up a pop-up window asking "Remove this stay from group?" If you click OK, the reservation will no longer be associated with the Group, and will instead be considered a completely separate, individual reservation. This will return the room to the available block of rooms if the block has not yet been released.
Date Updated November 10, 2020